古河電工ネットワーク機器の総合ブランド ファイテルネット

設定例
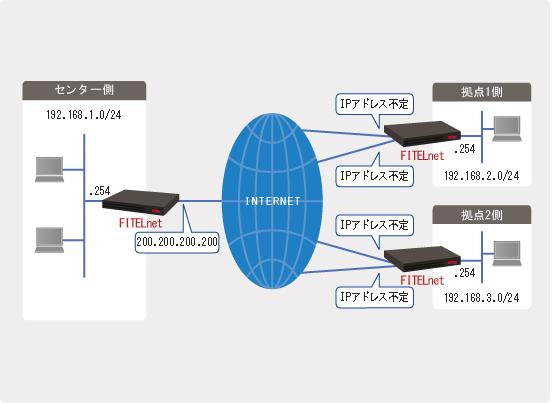
2.拠点側 ( F140 )の回線を冗長化する
概要
補足・注意点
センター側( F2000 × 1 台 , 1 回線 )、拠点側( F140 × 1 台 , 2 回線 )の例です。
ここでは、イー・モバイルのデータ通信カードを使用しておりますが、他のキャリアのものを使用することも可能です。
F140 がサポートしているデータ通信カードについては、こちらをご参照ください。
| ※ | データ通信カードの契約内容によっては、通信料のほかにプロバイダ接続料など別途料金が発生する場合があります |
設定データの例
| 項目 | 設定値 | |||
|---|---|---|---|---|
| センター | F2000 LAN インタフェース IP アドレス | 192.168.1.254/24 | ||
| F2000 PPPoE1 インタフェース IP アドレス | 200.200.200.200 | |||
| 拠点1 | F140 LAN インタフェース IP アドレス | 192.168.2.254/24 | ||
| F140 PPPoE1 インタフェース IP アドレス | 不定 | |||
| F140 Dialer1 インタフェース IP アドレス | 不定 | |||
| 拠点2 | F140 LAN インタフェース IP アドレス | 192.168.3.254/24 | ||
| F140 PPPoE1 インタフェース IP アドレス | 不定 | |||
| F140 Dialer1 インタフェース IP アドレス | 不定 | |||
コマンド設定の例
(!の行はコメントです。実際に入力する必要はありません。)
この設定を利用したい方は
拠点1 F140 の設定
!
!
! 特権ユーザモードに移行します。
!
Router> enable
Enter password: super ←パスワードを入力します(実際は何も表示されません)。

Router#
!
!
! 基本設定モードに移行します。
!
Router# configure terminal
Router(config)#
!
!
! ホスト名を " kyoten1 " とします。
!
Router(config)# hostname kyoten1
kyoten1(config)#
!
!
! LAN インタフェースの IP アドレスを設定します。
!
kyoten1(config)# interface lan 1
kyoten1(config-if lan 1)# ip address 192.168.2.254 255.255.255.0
kyoten1(config-if lan 1)# exit
!
!
! PPPoE1 インタフェースの各種設定を行います。
!
kyoten1(config)# interface pppoe 1
kyoten1(config-if pppoe 1)# pppoe server A-Provider
kyoten1(config-if pppoe 1)# pppoe account user1@xxxx.ne.jp secret1
kyoten1(config-if pppoe 1)# pppoe type host
kyoten1(config-if pppoe 1)# exit
!
!
! Dialer1 インタフェースの各種設定を行います。
!
kyoten1(config)# interface dialer 1
kyoten1(config-if dialer 1)# max-call off
kyoten1(config-if dialer 1)# caller *99***1#
kyoten1(config-if dialer 1)# ppp account em em
kyoten1(config-if dialer 1)# exit
!
!
! Mobile1 インタフェースの各種設定を行います。
!
kyoten1(config)# interface mobile 1
kyoten1(config-if mobile 1)# idle-timer send off
kyoten1(config-if mobile 1)# idle-timer receive off
kyoten1(config-if mobile 1)# forced disconnect packet off
kyoten1(config-if mobile 1)# forced disconnect cumulative-time off
kyoten1(config-if mobile 1)# auto connect on continuous *1
kyoten1(config-if mobile 1)# exit
!
!
! VPN ピアへの経路(ホストルート)を PPPoE1 インタフェースに向けます。
! イベントアクション機能で追加する経路より優先度を下げておきます。
!
kyoten1(config)# ip route 200.200.200.200 255.255.255.255 pppoe 1 200
!
!
! デフォルトルートを IPsec インタフェース1 に向けます。
!
kyoten1(config)# ip route 0.0.0.0 0.0.0.0 connected ipsecif 1
!
!
! イベントアクション機能の各種設定を行います。
!
kyoten1(config)# icmp-class 1
kyoten1(config-icmp-class 1)# logging event state-change enable
kyoten1(config-icmp-class 1)# address 200.200.200.200 nexthop pppoe 1
kyoten1(config-icmp-class 1)# exit
!
kyoten1(config)# event-class 1
kyoten1(config-event-class 1)# check ip-icmp 1 invert
kyoten1(config-event-class 1)# exit
!
kyoten1(config)# event-class 2
kyoten1(config-event-class 2)# check ip-icmp 1
kyoten1(config-event-class 2)# exit
!
kyoten1(config)# event-action 1
kyoten1(config-event-action 1)# add ip route 200.200.200.200 255.255.255.255 dialer 1
kyoten1(config-event-action 1)# clear ipsec-session isakmp-policy 1
kyoten1(config-event-action 1)# exit
!
kyoten1(config)# event-action 2
kyoten1(config-event-action 2)# clear ipsec-session isakmp-policy 1
kyoten1(config-event-action 2)# exit
!
kyoten1(config)# event-map
kyoten1(config-event-map)# event-class 1 event-action 1
kyoten1(config-event-map)# event-class 2 event-action 2
kyoten1(config-event-map)# exit
!
!
! VPN 機能を有効にします。
!
kyoten1(config)# vpn enable
!
!
! VPN 通信動作中の詳細なログを残す設定にします。
!
kyoten1(config)# vpnlog enable
!
!
! Phase1 ポリシーの各種設定を行います。
!
kyoten1(config)# crypto isakmp policy 1
kyoten1(config-isakmp)# authentication prekey
kyoten1(config-isakmp)# encryption aes 128
kyoten1(config-isakmp)# group 2
kyoten1(config-isakmp)# hash sha
kyoten1(config-isakmp)# idtype-pre userfqdn
kyoten1(config-isakmp)# key ascii FITELnet
kyoten1(config-isakmp)# my-identity f140@kyoten1
kyoten1(config-isakmp)# negotiation-mode aggressive
kyoten1(config-isakmp)# peer-identity address 200.200.200.200
kyoten1(config-isakmp)# exit
!
!
! Phase2 ポリシーの設定を行います。
!
kyoten1(config)# ipsec transform-set P2-POLICY esp-aes-128 esp-sha-hmac
!
!
! VPN セレクタの各種設定を行います。
!
kyoten1(config)# ipsec access-list 10 ipsec ip any any
kyoten1(config)# ipsec access-list 64 bypass ip any any
!
kyoten1(config)# crypto map center 1
kyoten1(config-crypto-map)# match address 10
kyoten1(config-crypto-map)# set peer address 200.200.200.200
kyoten1(config-crypto-map)# set security-association always-up
kyoten1(config-crypto-map)# set transform-set P2-POLICY
kyoten1(config-crypto-map)# exit
!
!
! IPsec インタフェース1 に crypto map を関連付けます。
!
kyoten1(config)# interface ipsecif 1
kyoten1(config-if ipsecif 1)# crypto map center
kyoten1(config-if ipsecif 1)# exit
!
!
! 特権ユーザモードに戻ります。
!
kyoten1(config)# end
kyoten1#
!
!
! 設定を保存します。
!
kyoten1# save SIDE-A.cfg
% saving working-config
% finished saving

kyoten1#
!
!
! 設定を有効にするために再起動します。
!
kyoten1# reset
Are you OK to cold start?(y/n) y
| *1 : |
" continuous " オプションは、V01.02(00) 以降のファームウェアで対応しております 【注意】 データ通信カードの契約内容によっては、通信料のほかにプロバイダ接続料など別途料金が発生する場合があります |
コマンド設定の例
(!の行はコメントです。実際に入力する必要はありません。)
この設定を利用したい方は
拠点2 F140 の設定
!
!
! 特権ユーザモードに移行します。
!
Router> enable
Enter password: super ←パスワードを入力します(実際は何も表示されません)。

Router#
!
!
! 基本設定モードに移行します。
!
Router# configure terminal
Router(config)#
!
!
! ホスト名を " kyoten2 " とします。
!
Router(config)# hostname kyoten2
kyoten2(config)#
!
!
! LAN インタフェースの IP アドレスを設定します。
!
kyoten2(config)# interface lan 1
kyoten2(config-if lan 1)# ip address 192.168.3.254 255.255.255.0
kyoten2(config-if lan 1)# exit
!
!
! PPPoE1 インタフェースの各種設定を行います。
!
kyoten2(config)# interface pppoe 1
kyoten2(config-if pppoe 1)# pppoe server B-Provider
kyoten2(config-if pppoe 1)# pppoe account user2@xxxx.ne.jp secret2
kyoten2(config-if pppoe 1)# pppoe type host
kyoten2(config-if pppoe 1)# exit
!
!
! Dialer1 インタフェースの各種設定を行います。
!
kyoten2(config)# interface dialer 1
kyoten2(config-if dialer 1)# max-call off
kyoten2(config-if dialer 1)# caller *99***1#
kyoten2(config-if dialer 1)# ppp account em em
kyoten2(config-if dialer 1)# exit
!
!
! Mobile1 インタフェースの各種設定を行います。
!
kyoten2(config)# interface mobile 1
kyoten2(config-if mobile 1)# idle-timer send off
kyoten2(config-if mobile 1)# idle-timer receive off
kyoten2(config-if mobile 1)# forced disconnect packet off
kyoten2(config-if mobile 1)# forced disconnect cumulative-time off
kyoten2(config-if mobile 1)# auto connect on continuous *1
kyoten2(config-if mobile 1)# exit
!
!
! VPN ピアへの経路(ホストルート)を PPPoE1 インタフェースに向けます。
! イベントアクション機能で追加する経路より優先度を下げておきます。
!
kyoten2(config)# ip route 200.200.200.200 255.255.255.255 pppoe 1 200
!
!
! デフォルトルートを IPsec インタフェース1 に向けます。
!
kyoten2(config)# ip route 0.0.0.0 0.0.0.0 connected ipsecif 1
!
!
! イベントアクション機能の各種設定を行います。
!
kyoten2(config)# icmp-class 1
kyoten2(config-icmp-class 1)# logging event state-change enable
kyoten2(config-icmp-class 1)# address 200.200.200.200 nexthop pppoe 1
kyoten2(config-icmp-class 1)# exit
!
kyoten2(config)# event-class 1
kyoten2(config-event-class 1)# check ip-icmp 1 invert
kyoten2(config-event-class 1)# exit
!
kyoten2(config)# event-class 2
kyoten2(config-event-class 2)# check ip-icmp 1
kyoten2(config-event-class 2)# exit
!
kyoten2(config)# event-action 1
kyoten2(config-event-action 1)# add ip route 200.200.200.200 255.255.255.255 dialer 1
kyoten2(config-event-action 1)# clear ipsec-session isakmp-policy 1
kyoten2(config-event-action 1)# exit
!
kyoten2(config)# event-action 2
kyoten2(config-event-action 2)# clear ipsec-session isakmp-policy 1
kyoten2(config-event-action 2)# exit
!
kyoten2(config)# event-map
kyoten2(config-event-map)# event-class 1 event-action 1
kyoten2(config-event-map)# event-class 2 event-action 2
kyoten2(config-event-map)# exit
!
!
! VPN 機能を有効にします。
!
kyoten2(config)# vpn enable
!
!
! VPN 通信動作中の詳細なログを残す設定にします。
!
kyoten2(config)# vpnlog enable
!
!
! Phase1 ポリシーの各種設定を行います。
!
kyoten2(config)# crypto isakmp policy 1
kyoten2(config-isakmp)# authentication prekey
kyoten2(config-isakmp)# encryption aes 128
kyoten2(config-isakmp)# group 2
kyoten2(config-isakmp)# hash sha
kyoten2(config-isakmp)# idtype-pre userfqdn
kyoten2(config-isakmp)# key ascii FITELnet
kyoten2(config-isakmp)# my-identity f140@kyoten2
kyoten2(config-isakmp)# negotiation-mode aggressive
kyoten2(config-isakmp)# peer-identity address 200.200.200.200
kyoten2(config-isakmp)# exit
!
!
! Phase2 ポリシーの設定を行います。
!
kyoten2(config)# ipsec transform-set P2-POLICY esp-aes-128 esp-sha-hmac
!
!
! VPN セレクタの各種設定を行います。
!
kyoten2(config)# ipsec access-list 10 ipsec ip any any
kyoten2(config)# ipsec access-list 64 bypass ip any any
!
kyoten2(config)# crypto map center 1
kyoten2(config-crypto-map)# match address 10
kyoten2(config-crypto-map)# set peer address 200.200.200.200
kyoten2(config-crypto-map)# set security-association always-up
kyoten2(config-crypto-map)# set transform-set P2-POLICY
kyoten2(config-crypto-map)# exit
!
!
! IPsec インタフェース1 に crypto map を関連付けます。
!
kyoten2(config)# interface ipsecif 1
kyoten2(config-if ipsecif 1)# crypto map center
kyoten2(config-if ipsecif 1)# exit
!
!
! 特権ユーザモードに戻ります。
!
kyoten2(config)# end
kyoten2#
!
!
! 設定を保存します。
!
kyoten2# save SIDE-A.cfg
% saving working-config
% finished saving

kyoten2#
!
!
! 設定を有効にするために再起動します。
!
kyoten2# reset
Are you OK to cold start?(y/n) y
| *1 : |
" continuous " オプションは、V01.02(00) 以降のファームウェアで対応しております 【注意】 データ通信カードの契約内容によっては、通信料のほかにプロバイダ接続料など別途料金が発生する場合があります |
コマンド設定の例
(!の行はコメントです。実際に入力する必要はありません。)
この設定を利用したい方は
センター側 F2000 の設定
!
!
! 特権ユーザモードに移行します。
!
Router> enable
Enter password: super ←パスワードを入力します(実際は何も表示されません)。

Router#
!
!
! 基本設定モードに移行します。
!
Router# configure terminal
Router(config)#
!
!
! ホスト名を " center " とします。
!
Router(config)# hostname center
!
!
! LAN インタフェースの IP アドレスを設定します。
!
center(config)# interface lan 1
center(config-if lan 1)# ip address 192.168.1.254 255.255.255.0
center(config-if lan 1)# exit
!
!
! PPPoE1 インタフェースの各種設定を行います。
!
center(config)# interface pppoe 1
center(config-if pppoe 1)# pppoe server C-Provider
center(config-if pppoe 1)# pppoe account user3@xxxx.ne.jp secret3
center(config-if pppoe 1)# ip address 200.200.200.200
center(config-if pppoe 1)# pppoe type host
center(config-if pppoe 1)# exit
!
!
! NAT+( IP マスカレード )の設定を行います。
!
center(config)# access-list 99 permit 192.168.1.0 0.0.0.255
center(config)# access-list 99 permit 192.168.2.0 0.0.0.255
center(config)# access-list 99 permit 192.168.3.0 0.0.0.255
!
center(config)# interface pppoe 1
center(config-if pppoe 1)# ip nat inside source list 99 interface
center(config-if pppoe 1)# exit
!
!
! フィルタリングの設定を行います。 *2
!
center(config)# access-list 140 permit icmp any host 200.200.200.200 echo
center(config)# access-list 145 permit icmp host 200.200.200.200 any echo-reply
center(config)# access-list 150 permit esp any host 200.200.200.200
center(config)# access-list 155 permit esp host 200.200.200.200 any
center(config)# access-list 190 dynamic permit ip any any
center(config)# access-list 199 deny ip any any
!
center(config)# interface pppoe 1
center(config-if pppoe 1)# ip access-group 140 in
center(config-if pppoe 1)# ip access-group 145 out
center(config-if pppoe 1)# ip access-group 150 in
center(config-if pppoe 1)# ip access-group 155 out
center(config-if pppoe 1)# ip access-group 190 out
center(config-if pppoe 1)# ip access-group 199 in
center(config-if pppoe 1)# exit
!
!
! デフォルトルートを PPPoE1 インタフェースに向けます。
!
center(config)# ip route 0.0.0.0 0.0.0.0 pppoe 1
!
!
! 拠点のセグメント宛の経路を IPsec インタフェースに向けます。
!
center(config)# ip route 192.168.2.0 255.255.255.0 connected ipsecif 1
center(config)# ip route 192.168.3.0 255.255.255.0 connected ipsecif 2
!
!
! VPN 機能を有効にします。
!
center(config)# vpn enable
!
!
! VPN 通信動作中の詳細なログを残す設定にします。
!
center(config)# vpnlog enable
!
!
! 拠点1 用の Phase1 ポリシーの各種設定を行います。
!
center(config)# crypto isakmp policy 1
center(config-isakmp)# authentication prekey
center(config-isakmp)# encryption aes 128
center(config-isakmp)# group 2
center(config-isakmp)# hash sha
center(config-isakmp)# idtype-pre userfqdn
center(config-isakmp)# key ascii FITELnet
center(config-isakmp)# negotiation-mode aggressive
center(config-isakmp)# peer-identity host f140@kyoten1
center(config-isakmp)# exit
!
!
! 拠点2 用の Phase1 ポリシーの各種設定を行います。
!
center(config)# crypto isakmp policy 2
center(config-isakmp)# authentication prekey
center(config-isakmp)# encryption aes 128
center(config-isakmp)# group 2
center(config-isakmp)# hash sha
center(config-isakmp)# idtype-pre userfqdn
center(config-isakmp)# key ascii FITELnet
center(config-isakmp)# negotiation-mode aggressive
center(config-isakmp)# peer-identity host f140@kyoten2
center(config-isakmp)# exit
!
!
! Phase2 ポリシーの設定を行います。
!
center(config)# ipsec transform-set P2-POLICY esp-aes-128 esp-sha-hmac
!
!
! 拠点1 用の VPN セレクタの設定を行います。
!
center(config)# ipsec access-list 1 ipsec ip any any
!
center(config)# crypto map kyoten1 1
center(config-crypto-map)# match address 1
center(config-crypto-map)# set peer host f140@kyoten1
center(config-crypto-map)# set transform-set P2-POLICY
center(config-crypto-map)# exit
!
!
! IPsec インタフェース1 に拠点1 用の crypto map を関連付けます。
!
center(config)# interface ipsecif 1
center(config-if ipsecif 1)# crypto map kyoten1
center(config-if ipsecif 1)# exit
!
!
! 拠点2 用の VPN セレクタの設定を行います。
!
center(config)# ipsec access-list 2 ipsec ip any any
!
center(config)# crypto map kyoten2 2
center(config-crypto-map)# match address 2
center(config-crypto-map)# set peer host f140@kyoten2
center(config-crypto-map)# set transform-set P2-POLICY
center(config-crypto-map)# exit
!
!
! IPsec インタフェース2 に拠点2 用の crypto map を関連付けます。
!
center(config)# interface ipsecif 2
center(config-if ipsecif 2)# crypto map kyoten2
center(config-if ipsecif 2)# exit
!
!
! VPN セレクタに bypass 指定の ipsec access-list を登録します。
!
center(config)# ipsec access-list 64 bypass ip any any
!
!
! 特権ユーザモードに戻ります。
!
center(config)# end
center#
!
!
! 設定を保存します。
!
center# save SIDE-A.cfg
% saving working-config
% finished saving

center#
!
!
! 設定を有効にするために再起動します。
!
center# reset
Are you OK to cold start?(y/n) y
| *2 : |
従来の機種では、自局宛の ESP パケットはフィルタリングの対象となりませんでしたが、FITELnet F2000 でルートベースの IPsec の設定( IPsec インタフェースの設定)を行った場合、自局宛の ESP パケットがフィルタリングの対象となります。 今回の場合、FITELnet F2000 で IPsec インタフェースを使用しておりますので、 自局宛の ESP パケットはフィルタリングの対象となります。 したがって、自局宛の ESP パケットを受け取れるように設定する必要があります。(学習フィルタリングが中途半端に適用されないように、スタティックのフィルタリングの in と out 両方で許可する必要があります。) |
All Rights Reserved, Copyright(C) FURUKAWA ELECTRIC CO., LTD. 2009